Wow, last time I blogged was May of 2013.... it is now December of 2014. What is my excuse? Don't really have one. It wasn't for lack of things to share.
As I wrote in one of my songs.... yes, I write songs too..... "I've taken a step back, but that doesn't mean that it's the end of me..."
So stay tuned for more creativity!
Thursday, December 4, 2014

Wednesday, May 22, 2013
Completion!
Sometimes projects take longer than expected to be completed. Life gets in the way and interests shift. That might explain my temporary disappearance on here, but really that doesn't mean I haven't been creative for the last few months. No, it just means that I've been thinking and planning and completing less. However, I did finally finish decorating my office at work. As a follow up to two previous posts on the same subject, Circle, circle, dot, dot. and Office Space, I have done just about everything I would do in an office space that isn't at home. The biggest project I gave myself was the wall photo collage. If you recall, I purchased a dark brown metal wall hanging from Home Goods. The wall hanging has interlocking circles and before I ripped them off mostly with my bare hands, had candle holders on hinges at the bottom of the circles. I spray painted the remaining wall hanging white and proceeded to cut out silver matte boards to fill the background of the wall hanging. I purchased from A.C. Moore white picture matte boards in various sizes and cut out sections of the larger silver matte board to accommodate them. Let me tell you, that was not easy! And by no means did it come out perfect. But, I think it looks cool.

Back to the rest of the office for a moment... Remember, the cool clock I got from Home Goods?

I also got some vases and a really cool hourglass. I love hourglasses! I learned my lesson from David Bromstad of Color Splash, group things in odd numbers. Either one item, three or five.

I already put up a series of three photos that I took and a really cool faux succulent planter that I painted white (also from Home Goods).


Okay, so I know that it is a little hard to see the pictures clearly but.....
Bottom left - California coastline near Big Sur off of Pacific Highway 1
Middle left - Ghost Tree along 17 mile drive in CA (right near the famous lone cypress which was a great picture too, but this one won)
Top left - Building facade in Old San Juan, PR
Middle right - The Palace Riu Hotel in Aruba from my balcony overlooking the fabulous pool with the ocean as a backdrop! Palace Riu take me away!
Top right - Pretty mysterious gate leading into a lush green garden in Nantucket, MA
Bottom right - Close up of tiny pink flowers covering or rather carpeting the rocks and moss along the coastline of Lover's Point in Pebble Beach CA. I hadn't and probably never will again see anything like it!

Back to the rest of the office for a moment... Remember, the cool clock I got from Home Goods?

I also got some vases and a really cool hourglass. I love hourglasses! I learned my lesson from David Bromstad of Color Splash, group things in odd numbers. Either one item, three or five.

I already put up a series of three photos that I took and a really cool faux succulent planter that I painted white (also from Home Goods).

Putting it all together!

For the photo collage, instead of pictures of flowers and such that I've taken and which I already have on the wall to the left, I decided that I would pick some of my favorite and most happy memories of places I have visited. When I look up at my photo collage which is directly over my desk, I am transported to those special places once again and I feel happy.
And now for the final reveal of the photo collage!

Okay, so I know that it is a little hard to see the pictures clearly but.....
Bottom left - California coastline near Big Sur off of Pacific Highway 1
Middle left - Ghost Tree along 17 mile drive in CA (right near the famous lone cypress which was a great picture too, but this one won)
Top left - Building facade in Old San Juan, PR
Middle right - The Palace Riu Hotel in Aruba from my balcony overlooking the fabulous pool with the ocean as a backdrop! Palace Riu take me away!
Top right - Pretty mysterious gate leading into a lush green garden in Nantucket, MA
Bottom right - Close up of tiny pink flowers covering or rather carpeting the rocks and moss along the coastline of Lover's Point in Pebble Beach CA. I hadn't and probably never will again see anything like it!
Thanks for stopping by and Stay tuned for more creativity!!!
Tuesday, February 26, 2013
Fire!
While it's still winter, I would like to tell you about the electric fireplace that I'm drooling over. Lord knows when it will be mine, but a girl can dream and plan! I do a lot of both of those things.
Made by Classic Flame, the white artesian is the one. I just hope it's still available when I'm ready to purchase it.


Made by Classic Flame, the white artesian is the one. I just hope it's still available when I'm ready to purchase it.

I originially had my heart set on this Kenton made by Dimplex:

My mind was changed though because I was in the Fortunoff Backyard store this winter and I got to see the Dimplex and the Classic Flame electric fireplaces in action. I thought that the Classic Flame looked brighter and was much more impressive than the Dimplex. Dimplex, which I've heard great things about, was disappointing in the flames department but aesthetically, I like the Dimplex mantle design better. Ultimately, the flame is more important to me so Classic Flame wins it.
I can't wait to sit in front of the cozy "fire" during the long winter nights....and any other night. I also can't wait to get that flat screen TV to go above it! Maybe next winter.
Thanks for stopping by and Stay tuned for more creativity!
Monday, January 14, 2013
To Keep Or Not To Keep?
That is the question!
I need help making a very difficult decision. Do I keep the jeweled headboard I made with my own two hands, which I still love and is really cool but not exactly elegant OR do I replace it with a white upholstered headboard which I think would be elegant and really pull the room together? I'm very torn. I was trying to come up with a way to keep the headboard and still bring in more white but when I played around with photoshop as you will see below, the upholstered headboard looked right. Let me explain more.
I have white croc vinyl left over from the ottoman I reupholstered and I thought perhaps I could do something cool with it over my bed. My original plan was to have a cornice above the bed perhaps made out of the croc vinyl (which I still may do) and fabric draping behind and on the sides of the bed. Like the "canopy" I had before but with white fabric (with perhaps a geometric print) against the red and much nicer and more modern. Here's what I had in my rental. It at least gives you an idea of what I'm talking about.

I also thought perhaps I could try putting the vinyl up on the wall from the ceiling down behind my jeweled headboard and using upholstery studs down the length of each side to finish it off. I wanted to see what that would look like, so I taped a piece of the vinyl to the wall just to see if I would like it. Now, just keep in mind that the jeweled headboard is supposed to be a foot higher up when properly installed on the wall (which it's not). And the vinyl is supposed to be bigger. Also keep in mind that there will be white crown molding eventually.

It could be cool. But, not really enough. Perhaps, if I also had the cornice and the fabric draping on either side, but then why bother with the vinyl? Okay, well...then I thought perhaps I would keep my headboard but make a cover for it so that I could use it both ways. Here's what that could look like:


It looks better than the jeweled headboard, right? It's okay, you can tell me the truth! What do you really think? I need help! I also, have toyed with the idea of painting the metal frame around the jeweled insert white. I don't know...
I hate the thought of getting rid of my headboard, but I really have no other use for it and I have no place to store it either.
I'm counting on your input so please tell me what you would do!
Thanks for stopping by and Stay tuned for the final decision and more creativity!


Tuesday, December 18, 2012
Lights Are On
I love the lights of the holiday season! When I lived in Manhattan, there was a street near where I lived on the upper east side where all of the trees were covered with warm white lights. I used to make sure I took that route home after work.

To bring the holiday warmth into my own home, I decided get these lights that come in mesh form. I found them at Target. My terrace is about 16 feet long, so I got two 4' X 8' sheets of multicolored lights. There are so many choices these days. Bulb size, color, led, etc. I had the faux evergreen wreath with white lights which I had used that last year, twisting it around the top of the terrace rail. This year, I even got a timer! You know what I used to attach the lights to the terrace? Arts and Crafts pipe cleaners! A bag for basically one dollar. I was looking for a roll of twist tie wire, but couldn't find one. The pipe cleaners worked like a charm. You can see them in the following picture. I thought it was a genius idea, until I told my sister I couldn't find the twist ties and asked her what she thought I used and she guessed it right away... oh well.


The last two years I put up my pre-lit 7.5 foot high faux tree without any other adornment. I figured since it didn't have any ornaments, nobody could rightly call it a Christmas tree, which it's not. But I decided I don't care anymore what anyone thinks. The darn thing is for me to enjoy! After I grabbed the lights for the terrace, I was wandering around in the holiday decoration section and I happened to spy these crystal clear acrylic gem looking "ornaments". That did it! I held out for two years and then I caved. Another chance to put bling up, are you kidding me?! Okay, you don't have to twist my arm. Then I happened to be in Rite Aid looking through every aisle because I was enjoying looking at everything and then I saw them. The perfect complement to the clear crystal drops, clear acrylic snowflakes! I LOVE SNOWFLAKES! I kind of walked out of Target saying to myself, maybe I'll return the ornaments. But after seeing the snowflakes, the deal was pretty much sealed. I will say that I still kept is simple. I could have gone crazy with the ornaments.

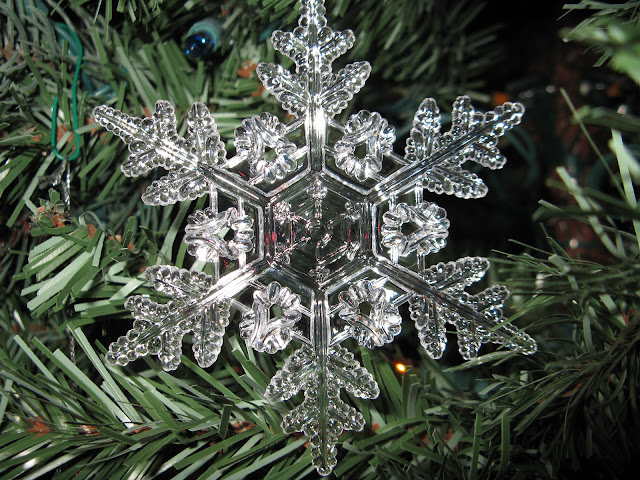
See how they pick up the lights from the tree! Pretty! They glow and when the tree isn't lit, they shine in the daylight. I was debating on whether or not to put up a tree topper. My ceilings are 8 feet and the tree is 7.5 feet. I couldn't find anything I liked in the size I needed. Surprise, surprise, I am going to make my own. I am going to glue three of the clear snowflakes together so that it is 3D and then slip that over a branch at the top. The snowflakes pick up the lights up there and glow.


To bring the holiday warmth into my own home, I decided get these lights that come in mesh form. I found them at Target. My terrace is about 16 feet long, so I got two 4' X 8' sheets of multicolored lights. There are so many choices these days. Bulb size, color, led, etc. I had the faux evergreen wreath with white lights which I had used that last year, twisting it around the top of the terrace rail. This year, I even got a timer! You know what I used to attach the lights to the terrace? Arts and Crafts pipe cleaners! A bag for basically one dollar. I was looking for a roll of twist tie wire, but couldn't find one. The pipe cleaners worked like a charm. You can see them in the following picture. I thought it was a genius idea, until I told my sister I couldn't find the twist ties and asked her what she thought I used and she guessed it right away... oh well.


The last two years I put up my pre-lit 7.5 foot high faux tree without any other adornment. I figured since it didn't have any ornaments, nobody could rightly call it a Christmas tree, which it's not. But I decided I don't care anymore what anyone thinks. The darn thing is for me to enjoy! After I grabbed the lights for the terrace, I was wandering around in the holiday decoration section and I happened to spy these crystal clear acrylic gem looking "ornaments". That did it! I held out for two years and then I caved. Another chance to put bling up, are you kidding me?! Okay, you don't have to twist my arm. Then I happened to be in Rite Aid looking through every aisle because I was enjoying looking at everything and then I saw them. The perfect complement to the clear crystal drops, clear acrylic snowflakes! I LOVE SNOWFLAKES! I kind of walked out of Target saying to myself, maybe I'll return the ornaments. But after seeing the snowflakes, the deal was pretty much sealed. I will say that I still kept is simple. I could have gone crazy with the ornaments.


See how they pick up the lights from the tree! Pretty! They glow and when the tree isn't lit, they shine in the daylight. I was debating on whether or not to put up a tree topper. My ceilings are 8 feet and the tree is 7.5 feet. I couldn't find anything I liked in the size I needed. Surprise, surprise, I am going to make my own. I am going to glue three of the clear snowflakes together so that it is 3D and then slip that over a branch at the top. The snowflakes pick up the lights up there and glow.


Thanks for stopping by and Stay tuned for more creativity!
Sunday, December 16, 2012
The Blue, The Bold and The Beautiful
Dramatic, just like a good soap opera, is the bold beautiful blue seed bead ring I recently added to my growing collection. I can't help it! I love jewelry and I love making things. It's either a recipe for disaster or success. I got my first order for a replica of the tanzanite crystal ring posted earlier, despite the fact that I wasn't intending on starting a business. Either way, it remains to be seen. Though, I can tell you for certain, that more rings will be forthcoming. I'm already in the planning stages. Besides, I have to keep you entertained! Bold blue seed beads, surrounding a large oval cz stone mounted in the east to west orientation. I was going for a domed effect with this one. What do you think?

Another statement ring! It says, look at me, I'm very sparkly!

Thanks for stopping by and Stay tuned for more creativity!
Wednesday, December 12, 2012
Knitting Becomes Obsession
Not only do I like knitting, once I get started, I actually crave it and go through withdrawal when I'm not able to do it. Can anyone relate? I have been knitting on the train to and from and I think it really annoys some people, while others are curious. It's kind of amusing. I try to be considerate when someone sits right next to me on the train and I am knitting, but I have to do it! I only knit on circular needles which cuts down tremendously on the movement. But frankly, it's better than sitting next to someone reading the newspaper. Oh well, people will get over it or go sit somewhere else.
I finished my "so cozy warmer." I was having size issues and also with a cast on row that was cast on a little too tight. The trick was taking out my Joy Mangano's trusty handheld small steamer and blocking the warmer. For those of you not familiar with knitting, a cast on row is the first row of a knitting piece and blocking is a process for shaping or smoothing a piece into the final product. I like to use steam for my blocking but others wet their knitting pieces. To explain in more detail: when I knit a scarf, the edges often curl and I block it to make the edges flat. This is done by pinning down the scarf and especially the curled edges on cardboard or something similar. The next step is steaming the straightened out scarf and then letting it air dry. The other good thing about blocking is that it can help with accidents or mistakes. What I mean by that is: knitted pieces usually have a little stretch that can be played with to make a piece bigger or even smaller depending on what you need it to do. Blocking can help, but it can't fix a glaring mistake. The process of blocking helped make my warmer a little bigger when it was a little small. I wouldn't recommend relying on blocking though. Measure, measure, measure!

I am almost done with my circular/eternity scarf and I am almost done making a neck warmer. The neck warmer is really just a 14 inch long tube that fits over your head. You can fold it in different ways or just scrunch it down your neck. The neck warmer is black with a shimmer to it. Here's a photo, though it doesn't really show well.

The next knitting project I want to try to tackle, if I succeed, will be the most difficult project I've done yet. I found a really cool pattern for a sweater vest. I'm only at the fact finding stage for that one, but hope to have something to show you soon.
I finished my "so cozy warmer." I was having size issues and also with a cast on row that was cast on a little too tight. The trick was taking out my Joy Mangano's trusty handheld small steamer and blocking the warmer. For those of you not familiar with knitting, a cast on row is the first row of a knitting piece and blocking is a process for shaping or smoothing a piece into the final product. I like to use steam for my blocking but others wet their knitting pieces. To explain in more detail: when I knit a scarf, the edges often curl and I block it to make the edges flat. This is done by pinning down the scarf and especially the curled edges on cardboard or something similar. The next step is steaming the straightened out scarf and then letting it air dry. The other good thing about blocking is that it can help with accidents or mistakes. What I mean by that is: knitted pieces usually have a little stretch that can be played with to make a piece bigger or even smaller depending on what you need it to do. Blocking can help, but it can't fix a glaring mistake. The process of blocking helped make my warmer a little bigger when it was a little small. I wouldn't recommend relying on blocking though. Measure, measure, measure!

I am almost done with my circular/eternity scarf and I am almost done making a neck warmer. The neck warmer is really just a 14 inch long tube that fits over your head. You can fold it in different ways or just scrunch it down your neck. The neck warmer is black with a shimmer to it. Here's a photo, though it doesn't really show well.

The next knitting project I want to try to tackle, if I succeed, will be the most difficult project I've done yet. I found a really cool pattern for a sweater vest. I'm only at the fact finding stage for that one, but hope to have something to show you soon.
Thanks for stopping by and Stay tuned for more creativity!
Tuesday, November 27, 2012
Raspberry Swirl
Adding to the collection of seed bead rings, is one of my recent creations that I call: Raspberry Swirl. How do you make a raspberry swirl? First you take a purple turquoise pear shaped stone and then you surround it by tiny raspberry seed beads! Doesn't my raspberry swirl look delicious? Raspberry swirl is the title of a Tori Amos song, so I must give credit to her (though the song has nothing to do with the design).


You have to see it with flash and without - so here you go:


Thanks for stopping by and Stay tuned for more creativity!
Wednesday, November 21, 2012
Magnetic Personality
Magnetically speaking, my new nail polish is "interesting" and decidedly cool. Who decided? I did. Made by Sinful Colors, look what new effects are being made for nail polish wearers. Goodbye to the old boring plain flat nail polish. Now we have frost, glitter, crackling, magnetized, dry nail polish stickers, gel, uv gel and much more. What will they think of next!
This starburst look is achieved by applying the nail polish, which by the way looks completely normal and ordinary, and then taking the attached magnetic and hovering over the nail for a few short seconds. Cool huh? They almost have a 3D effect in person. Here's the view before I cleaned up the edges of my self-manicure.


This starburst look is achieved by applying the nail polish, which by the way looks completely normal and ordinary, and then taking the attached magnetic and hovering over the nail for a few short seconds. Cool huh? They almost have a 3D effect in person. Here's the view before I cleaned up the edges of my self-manicure.


Thanks for stopping by and Stay tuned for more creativity!
Monday, November 19, 2012
Ying and Yang
I hope you guys aren't getting bored with my seed bead rings because I've been on a roll! Here are two more lovelies! I call them my Ying and Yang rings and I think it's easy to see why... You think it would be too much if I wore them at the same time? Just kidding.
This time I decided instead of using all tiny seed beads, I would try using normal beads. I think they are cool. The middle stones are druzy quartz with an A/B finish (rainbow). The druzy stones aren't flat or rather even on top, they have dimension to them. Druzy quartz is big these days. Am I happening or what?


This time I decided instead of using all tiny seed beads, I would try using normal beads. I think they are cool. The middle stones are druzy quartz with an A/B finish (rainbow). The druzy stones aren't flat or rather even on top, they have dimension to them. Druzy quartz is big these days. Am I happening or what?


Thanks for stopping by and Stay tuned for more creativity!
Monday, November 12, 2012
Pure As The Driven Snow
The Nor'easter that came our way last week, brought with it a lot more snow than I had expected. The snow was light and fluffy. I got so excited that I had to take some pictures. I was hoping to capture some snowflakes with the camera but even though I didn't get perfect little snowflakes, I did get some really cool shots of snow crystals.


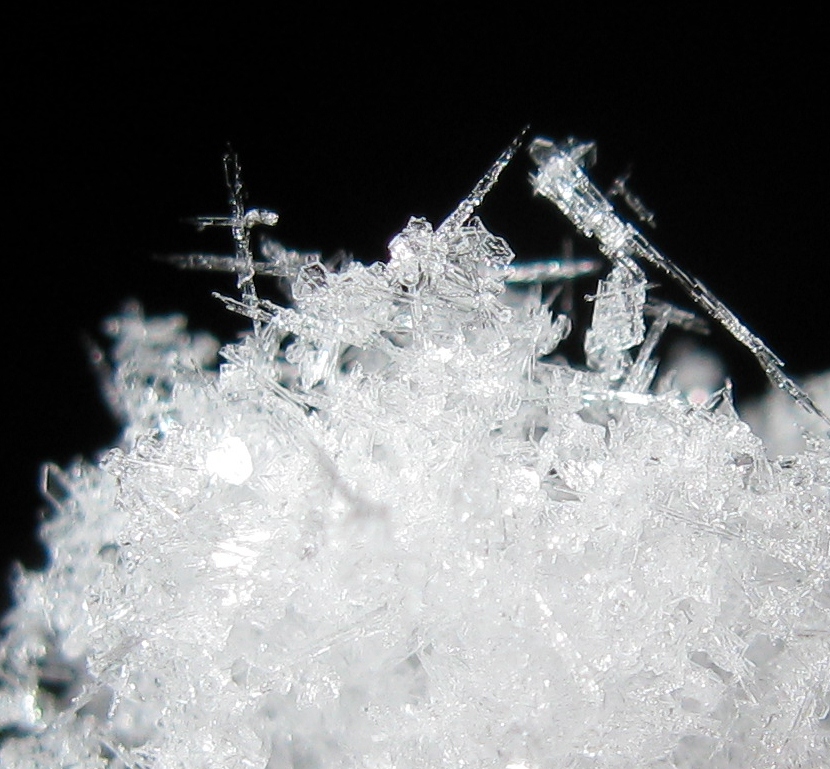


Not bad for a Canon point and shoot, eh? I think this calls for another haiku!
Twist and drift and fall
Tiny crystals connecting
White cold and perfect
So the next day, there was snow all over the place and the fall leaves were falling from the sky onto the white snow. I wanted to stop and take a picture along the way, but I was rushing to get to the train station. The snow covered trees still had green leaves on them. Now that's something you don't see every day!

Thanks for stopping by and Stay tuned for more creativity!
Sunday, November 11, 2012
Opposites Attract
On the color wheel orange and blue are complementary colors which is another way to say they are opposite each other on the wheel. As we all know, opposites attract and happen to look fantastic together. Case in point, my carnelian (orange) and turquoise (blue) seed bead rings!


The only disappointing thing about these rings is that orange and turquoise aren't really winter colors! But, have no doubt, they will be walking the town with me when spring peaks it's head out of the snow and maybe before!
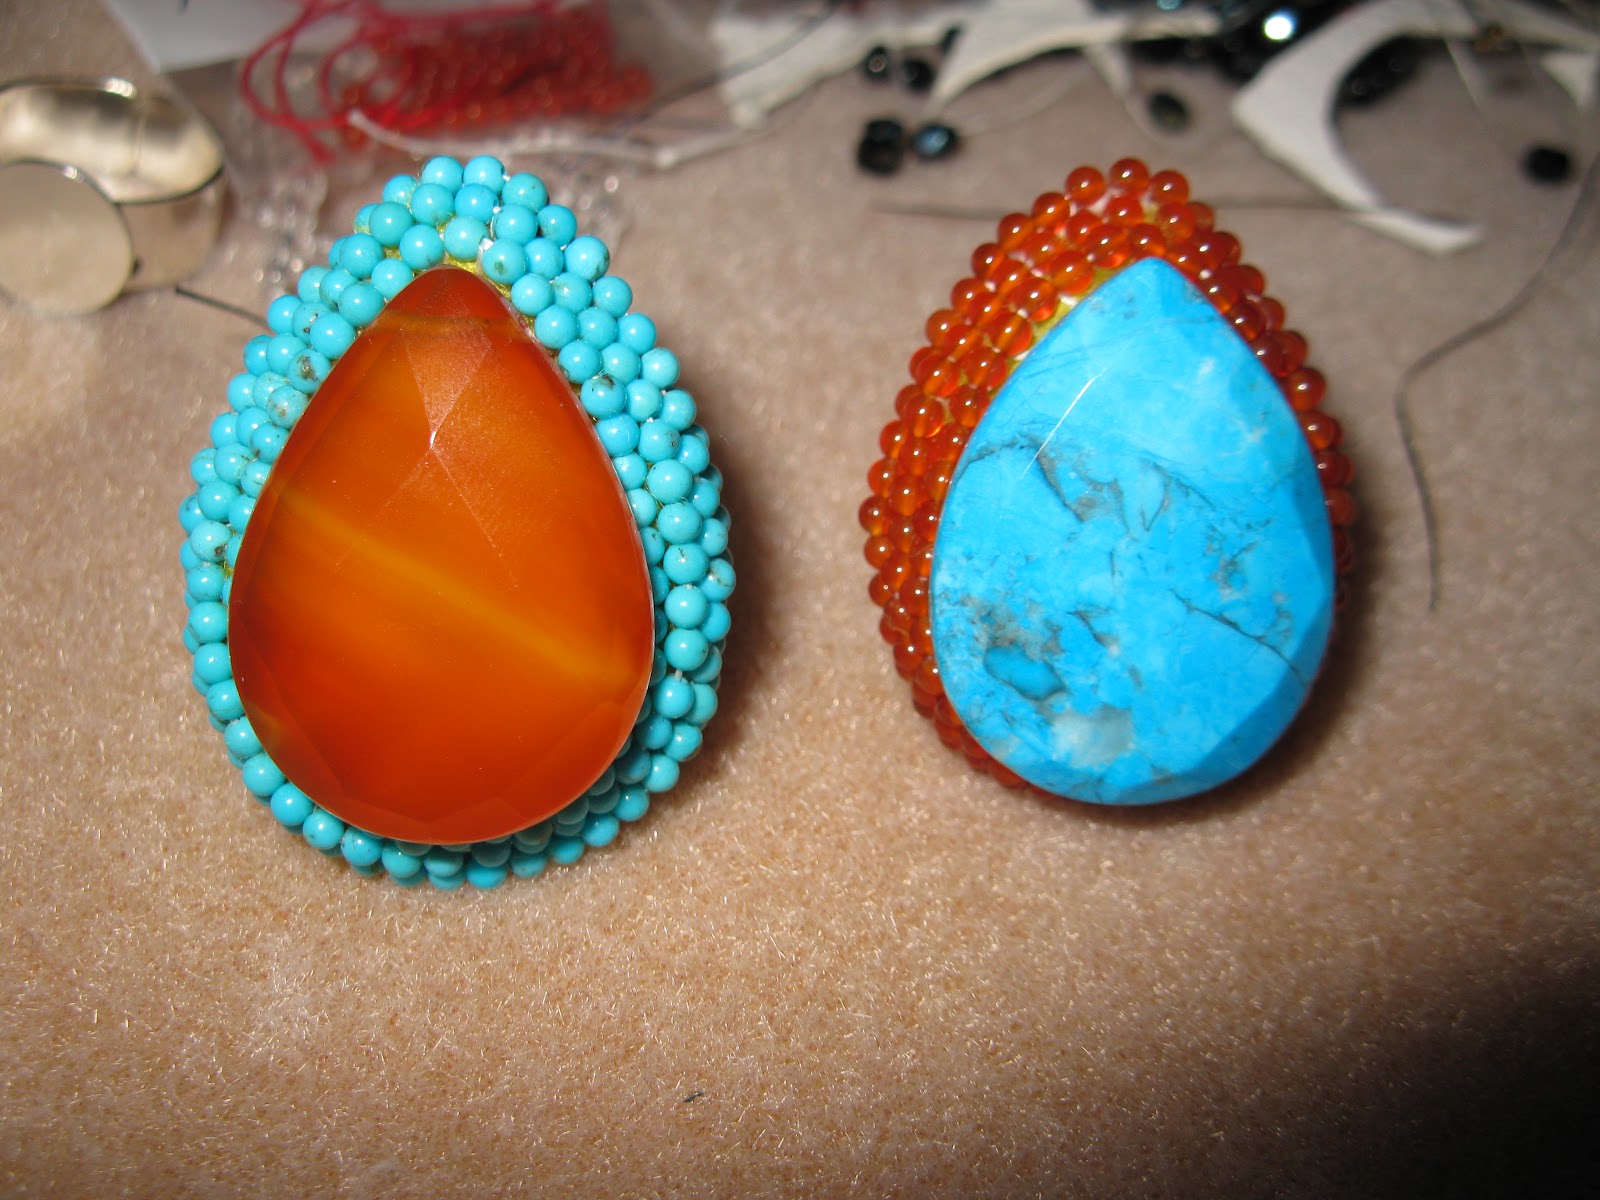


The only disappointing thing about these rings is that orange and turquoise aren't really winter colors! But, have no doubt, they will be walking the town with me when spring peaks it's head out of the snow and maybe before!
Thanks for stopping by and Stay tuned for more creativity!
Tuesday, November 6, 2012
A Tiny Miracle
When it turned from summer to fall, my pretty flowers on my terrace slowly faded away. While I waited for everything to dry out, as it is easier to cleanup when everything is dry, a tiny little spider came and setup camp in my flower box. I only know this, because one sunny morning, I walked out on my terrace to check the temperature and my eye was caught by the glimmer of sunlight reflecting off the almost imperceptible silken threads of a near perfect spider web.

Unfortunately, the spider was evicted shortly thereafter and the spider web was put into a garbage bag along with the rest of it. Don't worry, I made sure the spider got away before the demolition began. This story inspired a haiku poem:

Unfortunately, the spider was evicted shortly thereafter and the spider web was put into a garbage bag along with the rest of it. Don't worry, I made sure the spider got away before the demolition began. This story inspired a haiku poem:
O little spider
What a miracle you are
Spinning worlds of silk
Thanks for stopping by and Stay tuned for more creativity!
Saturday, November 3, 2012
Fishnet Nails
All of a sudden, everywhere I look, I see new and fabulous nail stickers being made by many of the beauty companies. I, having an apparent addiction to nail polish, am over the moon with the new styles. A running theme this season, is fishnet.
Loreal is making some really cool nail stickers. I found one called The Wise Mystic which is a project runway limited edition and here's what it looks like:


Loreal is making some really cool nail stickers. I found one called The Wise Mystic which is a project runway limited edition and here's what it looks like:


As you can see, you can wear some of these over colored nail polish because some designs have backgrounds that are transparent.
Here's another one from Loreal called Razzle Be Dazzle.

How about these? - Called Fishnet by Fright Night Nail Wraps.

And I can't wait to try these - from Loreal and called Bling Addict. Perfect name for me!

What fun these are! I love innovation! Nail stickers can be a little difficult to put on well, but they are worth the patience and effort. The Sally Hansen Salon Effects Nail Polish Strips are still much easier to put on. They are really like putting on nail polish versus the stickers which are thicker and harder. It's hard to describe. I wish Sally Hansen would come out with more cool designs. I don't happen to like most of the ones they have out on the market. What a shame!
Thanks for stopping by and Stay tuned for more creativity!
Wednesday, October 31, 2012
BOO!
Though this Halloween may not be the happiest of occasions given the destruction of Hurricane Sandy, I still wanted to evoke the spirit of the Halloween night.


See ghoulish images I've made with my Halloween decorations.


Hope you have a Spooky Halloween but in a good way!
My best to you and your families during this difficult time.
Thanks for stopping by and Stay tuned for more creativity!
Subscribe to:
Posts (Atom)